
Construction manual of a biogas digester by T.H. Culhane
Here is the description of the system, the basic principles are very simple, use the things you
find in your surroundings.


15. Put an elbow, ½” valve and hose adaptor on the ½” tank adaptor and connect to ½” Here is the description of the system, the basic principles are very simple, use the things you
find in your surroundings.
 |
| 1. Cut the top off at a 2.500 liter water tank.You have now made the stomach of your “sacred cow”. |
 |
| 2. Drill 2” hole at bottom of tank and 1” hole at top of tank. |

 |
| 3. Put tank adaptors in holes (threaded pipewith rubber gasket and locking nut, sometimes called bulkhead fittings (check aquarium shop). |
 |
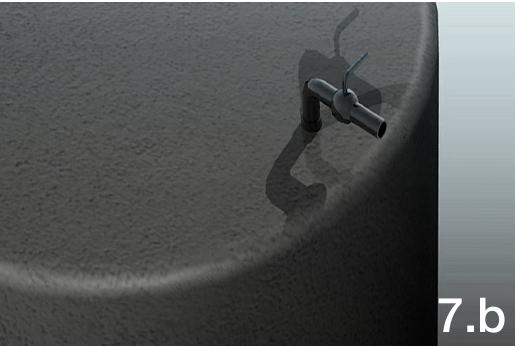
| 4. Fit 1” pipe in top hole (pic 4.a) on outside and 2” pipe inside tank that reaches to middle of tank. Fit 2” tube outside tank to elbow going into tank. This is your feeding tube or the “throat of the cow” (pic 4.b-c). |
 |
| biogas digester |

 |
| 5. Gas Collector. Take another tank that is smaller in diameter than the “stomach” tank you made (one that fits inside) but try to get one as close to the first tank as possible (for a 2.500 “stomach” tank you may only be able to find a 2.000 l “gas collector” tank. Cut holes in the bottom of this tank as shown (pic 5). |
 |
| 6. Cut 8 holes slightly larger than 2” in bottom. |
 |
| 7. Burn or drill a ½” hole in the top of the gas collector tank near the side as shown. |
 |
| Put a ½” tank fitting in this hole |
 |
| 9. Put small stones at bottom of stomach tank as homes for bacteria, but do not block or go higher than the output of the feeding pipe. |
 |
| 10. Fill with about 300 to 500 liters of water (grey water is fine).Then pour in about 100 kg of animal manure (this keeps the manure from being exposed to too much oxygen.If you put manure in first you aerate it as you add water and that can kill bacteria. Bu sure and use fresh moist or wet fermented manure). Fill the stomach tank to the top until some drips out the 1” pipe. |
 |
| 11. Cut 8 2” pipes slightly shorter than the height of the gas collector and cut holes in them like a church organ to let food in and gas out. |
 |
| 12. Fix a piece of ½” pipe (A) through one end of the 2” pipe and melt its ends so it flares out and can´t fall out of the 2” pipe. |
 |
| 13. Put the 2” pipe in the larger than 2” hole in the gas collector and when it is inserted, fix a ½” pipe (B) in the other end and flare it. Nowthe 2” pipe can’t fall out of the tank when it goes up and down. Do the same thing for the other 7 pipes. These are our “bacterial motels” or bacterial fuel rods! |
 |
| Add caption |
 | ||
| 14. Place the gas collector in the stomach tank. Let it sink down until completely submerged if possible, making sure that the bacteria hotels are straight up and down (you may need to turn the tank slowly as you put it in and let the air out”. |
plastic tube.
16. Wait 3 weeks or so with valve closed until gas collector starts to rise. Release all gas to air
and let it rise again. Release all gas in case it has oxygen in it.
17. The third time tank rises, try to light gas coming out. If it doesn’t light it has too much CO
2in it. Release it and let it rise again. One day it will light as CH2concentration rises.once it lights you can start slowly feeding.
18. When you connect the outcoming gas tube with your cooking place, make sure that a simple “water trap” is included, so that the pipes do not become blocked by condensing water.
 | |
| download diagram |
Related Post:
Biogas Plant Construction Manual Fixed-dome Digester
Constructing a Floating Drum Biogas Digester Part 4
Constructing a Floating Drum Biogas Digester inlet Part 3
Constructing a Floating Drum Biogas Digester outlet Part 2Step by Step Guide to Constructing a Floating Drum Biogas Digester Part 1
1 comments:
Many thanks for publishing this amazingly simple and easy guide for constructing a biogas digester.
Post a Comment